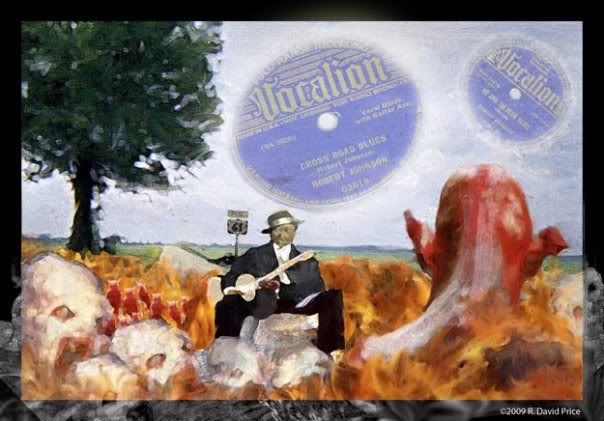
This weeks Illustration Friday topic is music. I've been listening to lots of blues lately and decided to experiment with some new brushes in Photoshop. So I created this digital painting with Photoshop CS4. This is an image of the birth of the career of Blues Legend, Robert Johnson who has legend has it, wanted to learn to play the blues and went down to the Crossroads and made a deal with the devil by selling his soul to learn to play the blues. This is my interpretation of what happened out on Highway 61 deep in the heart of the Mississsippi Delta region.
 <
<
4 comments:
David,
Very nice piece. I was wondering if some of the image got cut off when you posted it. I ask because I noticed a black border around 3 sides but not the on the 4th side (right). I would love to know what brushes you used. I'm working on an illustration for a friend for a story he wrote. I like the look you created in this illustration and would like to try the same technique. If you don't mind can you post some more info about the steps you took?
Margee
Looks like you are feeling better. :)
Hi Margee,
Thanks for taking the time to comment.
My reply is in multiple comment post so that it fits with-in the 4,096 character limit on replies I just discovered.
Part1
Thanks for the kind words about the work, yes the image did get cut-off, something related to the blogger template I'm using I imagine.
I'll try to answer your questions here.
I initially worked out my image with a pencil and paper and scanned that in. I used some photo references I gathered via bing.com image search of Robert Johnson and of the HIghway 61 Crossroads to see what the place really looked like.
Part 2
In Photoshop CS4 I used multiple layers to place each element in it's own layer. The background, Robert, The back of the devil, and the white demons and the little tiny red devils each are on their on layer including the flames which also exist on another layer as do the records in the sky. I also found those record images on bing.com and used the selection tool to isolate the labels at which point I pasted them in place in the sky. The images of Robert didn't turn up any in the pose I wanted so I ended up constructing his body in pieces, arms, head, guitar, stump to sit on etc. Each was on a different layer until I flatened them together after I got them positioned the way I wanted. I would be hard pressed to remember each brush I used but here is what I can remember I used the brushes that ship with the application so there are no custom brushes involved. I used the regular circle tips that load in the brush library first. I used many different sizes for different areas of color. I also used the triangle and square shapped brush tips a bit too. Mostly in certain detailed areas that the round ones didn't get into as well.
Part 3
Once I had my images down the way I wanted them I then zoomed in real close to the area I was working on at any given moment and switched from the brush too to the smudge tool. The one with the little fingertip icon. I then treat the figures as if they are clay and use the smudge tool to drag small sized smudges in the directions of the countours of the image, for example if I"m doing an arm or a leg I will go from one side to the other but making an arch shaped path that would follow the contour of that cylinder shaped limb as if it were a 3D object. I like the look that the smudge tool gives in Photoshop it is similar to the effects I get using brushes in Painter. The flames were added in a couple of different layers some behind the figures some in front, thinking of it like an animator uses different planes to create depth. I would take those flame colors and use the smudge tool to get my flame look and also use the dodge and burn tools on different portions of the flames to bring out the accents I wanted in them.
After all of that work was done and the image was close to finished I then went to the adjust image section of drop down menus and adjusted the Levels to bring out the dark areas. Then I go back to the Image adjustments pull down menu and use the Exposure sliders to do some tweaking followed by the same menu and then using the Vibrance settings to get the colors just the way I wanted them.
At this point I then adjusted my canvas size by adding a half inch all the way around with the filling option set to black. (I've recently started adding these borders around my images since I never know what kind of backgound they will be viewed against by different users or wherever they may be published on the web etc. That allows them to be set apart as the way I intended them to be seen and sort of replicates a framed image in a gallery or a matte border in a portfolio page so I always use black.) A couple of my layers with the flames and demons extended beyond my image area so when this new canvas space appeared the ghostly imagery effect showed up on top of the black borders at the bottom, this was just a unexpected effect that occured that I liked the looks of and kept.
Then I saved my 300dpi image for print use and did another Save for Web version to post online.
That pretty much sums up everything without a lot of detail about the drawings done on paper beforehand. In working with the scanned artwork, I just try to think of that as working with a black and white photograph as I begin adding color and lines which I'm doing the same way I would ink penciled art in doing a comic book style page of art. Except I don't outline in black rather I use the colors of the item to do the lines with in some cases just darkening them a little bit more than the surrounding colors. I also should mention that I had highlights with a round brush tool using white as a color and laying it in next to the darks to give that dimensional effect that provides fullness to each element.
I think I have covered everything for you at least I hope I have and haven't confused you. I probably could have explained better if I did something like this in a tutorial format rather than trying to recall what I did after the fact. Which I may eventually do something like that for the blog.
Again thanks for asking and if you have any questions that I created from this writing, just drop me a note and I'll try to follow-up asap. Also feel free to send me an image of what you do with any of this as I would love to see the results.
Good luck with your project.
Post a Comment